How to install Wordpress on Ubuntu
Learn how to set up WordPress on your Ubuntu Virtual Private Server for a seamless website building experience. We will install WordPress on Apache2 server and create our first post.

WordPress is the most popular open-source blogging system and CMS on the Web. It is based on PHP and MySQL. Its features can be extended with thousands of free plugins and themes.
In this tutorial we will install WordPress on Apache2 server and create our first post.
Prerequisites
- Ubuntu 20.04 VPS on RocketNode
Installing Dependencies
First, we need to make sure that the VPS you’re currently on is up to date with the latest patches. After that’s done, install Apache2, PHP, MySQL and some PHP extensions. Run the following commands to install them:
sudo apt update
sudo apt install apache2 \
                 ghostscript \
                 libapache2-mod-php \
                 mysql-server \
                 php \
                 php-bcmath \
                 php-curl \
                 php-imagick \
                 php-intl \
                 php-json \
                 php-mbstring \
                 php-mysql \
                 php-xml \
                 php-zip
Also, make sure that the Apache2 and MySQL services are running and that your system is up to date:
sudo systemctl enable apache2
sudo systemctl enable mysql
Install Wordpress
We’ll opt for the WordPress.org release instead of the APT package available in the Ubuntu Archive. This choice aligns with WordPress’s recommended approach, ensuring a smoother installation experience. Using the WordPress.org release minimizes the chances of encountering unexpected issues that may not have solutions readily available from the WordPress support volunteers.
Now, let’s proceed by creating the installation directory and downloading the file directly from WordPress.org:
sudo mkdir -p /srv/www
sudo chown www-data: /srv/www
curl https://wordpress.org/latest.tar.gz | sudo -u www-data tar zx -C /srv/www
Configure Apache2
We’ll create a new virtual host for our WordPress installation. Create a new configuration file for the WordPress site. You can use nano, vim or your preffered editor. This file should be located in /etc/apache2/sites-available/wordpress.conf:
<VirtualHost *:80>
    DocumentRoot /srv/www/wordpress
    <Directory /srv/www/wordpress>
        Options FollowSymLinks
        AllowOverride Limit Options FileInfo
        DirectoryIndex index.php
        Require all granted
    </Directory>
    <Directory /srv/www/wordpress/wp-content>
        Options FollowSymLinks
        Require all granted
    </Directory>
</VirtualHost>
Now, enable the new virtual host and restart Apache2:
sudo a2ensite wordpress
sudo a2enmod rewrite
sudo a2dissite 000-default
Finally, restart Apache2:
sudo systemctl restart apache2
Configure a MySQL Database
We’ll create a new MySQL database and user for our WordPress installation. Log in to MySQL as the root user:
sudo mysql -u root
And create a new database and user:
CREATE DATABASE wordpress;
CREATE USER wordpress@localhost IDENTIFIED BY 'change-this-to-your-password';
GRANT ALL PRIVILEGES ON wordpress.* TO wordpress@localhost;
FLUSH PRIVILEGES;
quit
To enable MySQL, write:
sudo service mysql start
Configure WordPress
Now, we’ll configure WordPress to use the MySQL database we created earlier. First, copy the sample configuration file to wp-config.php:
sudo -u www-data cp /srv/www/wordpress/wp-config-sample.php /srv/www/wordpress/wp-config.php
Following that, it’s time to configure the database credentials in the configuration file. Please take care not to replace ‘database_name_here’ or ‘username_here’ in the provided commands. However, do replace <your-password> with your actual database password:
sudo -u www-data sed -i 's/database_name_here/wordpress/' /srv/www/wordpress/wp-config.php
sudo -u www-data sed -i 's/username_here/wordpress/' /srv/www/wordpress/wp-config.php
sudo -u www-data sed -i 's/password_here/<your-password>/' /srv/www/wordpress/wp-config.php
To avoid security issues, we’ll have to change the unique keys and salts in the configuration file. You can generate new ones by visiting the WordPress Salt Generator.
First, find the lines in the configuration file that contain the unique keys and salts.
define('AUTH_KEY',         'put your unique phrase here' );
define('SECURE_AUTH_KEY',  'put your unique phrase here' );
define('LOGGED_IN_KEY',    'put your unique phrase here' );
define('NONCE_KEY',        'put your unique phrase here' );
define('AUTH_SALT',        'put your unique phrase here' );
define('SECURE_AUTH_SALT', 'put your unique phrase here' );
define('LOGGED_IN_SALT',   'put your unique phrase here' );
define('NONCE_SALT',       'put your unique phrase here' );
Once you’ve found them replace them with the new ones generated by the WordPress Salt Generator:
Save and close the configuration file by typing CTRL+X followed by Y then ENTER.
Finish the Installation
Now, we’ll finish the installation by visiting the WordPress installation page. Open your browser and navigate to http://your-vps-ip-address/. You should see the following page:
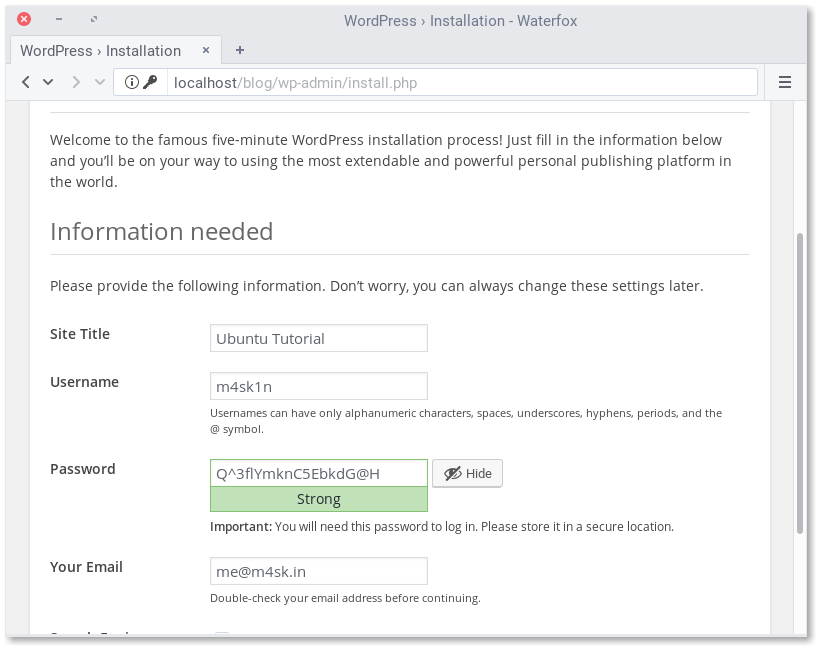
After completing the installation, you should be logged in! You can now start building your website.
Conclusion
In this tutorial, we learned how to set up WordPress on your Ubuntu Virtual Private Server for a seamless website building experience. We installed WordPress on Apache2 server. We also learned how to create a MySQL database and user for our WordPress installation. Finally, we configured WordPress to use the MySQL database we created earlier.
your hosting partner
RocketNode offers fast and affordable game and VPS hosting solutions on reliable and efficient hardware with AMD Epyc architecture and NVME storage to assure high performance.
See games & pricing