How to Set Up a Webserver using Nginx
Seting up a robust web server using Nginx on Ubuntu 22, understanding the prerequisites and the process of installation and configuration.

Introduction
Nginx is globally recognized as one of the most prevalent web servers, hosting some of the most high-traffic and largest websites. As a lightweight solution, it can function as a web server or a reverse proxy.
We’ll walk you through the process of installing Nginx on your Ubuntu 22 VPS, managing the Nginx process, adjusting the firewall, and setting up server blocks for hosting multiple domains on a single server.
Prerequisites
- A server running Ubuntu from RocketNode
- Root access to the VPS
Installing Nginx
Nginx can be installed from Ubuntu’s default repositories, since it’s included in them. Therefore, using the apt packaging system for installation is possible. Start by updating your local package index for the most recent package listings, and then install Nginx:
sudo apt update
sudo apt install nginx -y
Adjusting the Firewall
Before testing Nginx, ensure the firewall software is adjusted to permit access to the service. Nginx registers itself with ufw during installation, simplifying the process of allowing Nginx access. To list the application configurations known to ufw, use:
sudo ufw app list
You will see a list of application profiles, among which there are three profiles for Nginx: Nginx Full, Nginx HTTP, and Nginx HTTPS. For now, we only need to allow traffic on port 80, which can be enabled by:
sudo ufw allow 'Nginx HTTP'
You can verify the change by typing:
sudo ufw status
Checking your Nginx Web Server
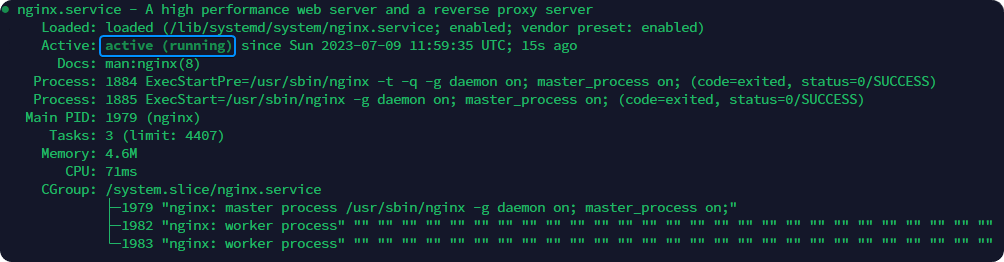
After setting up your firewall, your server should be already up and running. To further check this, you can type:
systemctl status nginx
Upon running this command, you should be seeing the following output. If your Nginx service is marked as active (running), then you should be good to go.
To further confirm that your server is indeed working correctly, you can access http://(your_vps_ip). You should be greeted by the following page upon accessing this address.

This is the default Nginx page once your server has been setup. In the next section you will learn how to manage your server such as: Starting, Restarting & Stopping.
How to Manage Nginx
With your web server now operational, it’s time to learn some basic management commands:
- To stop your web server, type:
sudo systemctl stop nginx - To start the web server when it is stopped, type:
sudo systemctl start nginx - To stop and then start the service again, type:
sudo systemctl restart nginx - To reload Nginx without dropping connections (useful for configuration changes), type:
sudo systemctl reload nginx - To disable automatic start when the server boots, type:
sudo systemctl disable nginx - To re-enable the service to start up at boot, type:
sudo systemctl enable nginx
After this, you’re prepared to configure the site for hosting multiple domains.
Setting up Your Domain (Server Blocks)
Nginx web server uses server blocks (similar to Apache’s virtual hosts) to host more than one domain from a single server. Let’s set up a domain called your_domain, but replace this with your actual domain name.
We’ll create a directory structure within /var/www/ for our site your_domain, leaving /var/www/html in place as the default directory. Follow these steps:
sudo mkdir -p /var/www/your_domain/html
sudo chown -R $USER:$USER /var/www/your_domain/html
sudo chmod -R 755 /var/www/your_domain
Next, we will create an example page to check if our server block is working correctly:
sudo nano /var/www/your_domain/html/index.html
Upon entering this command, a file editor will come up in which you can paste the following .html file to test your server block. You can paste the code below by pressing CTRL+V or CTRL+SHIFT+V depending on which SSH Client you’re using:
<html>
	<head>
		<title>RocketNode | My first Website!</title>
	</head>
	<body>
		<p>Horraay! My website is working!</p>
	</body>
</html>
Save the code up above by pressing CTRL+X, followed by Y + ENTER to confirm the changes.
In order to preserve the default Nginx configuration, we’ll make a new one by running:
sudo nano /etc/nginx/sites-available/your_domain
Paste the configuration down below to create your new server block’s configuration. This is very similar to the original one, however it is changed in order to work for our new folder and domain name:
server {
        listen 80;
        listen [::]:80;

        root /var/www/your_domain/html;
        index index.html index.htm index.nginx-debian.html;

        server_name your_domain www.your_domain;

        location / {
                try_files $uri $uri/ =404;
        }
}
Make sure to change your_domain with your actual domain in order to make your website reachable.
In order to complete our server block setup, we’ll have to move our configuration to the sites-enabled folder in order for our changes to take place:
sudo ln -s /etc/nginx/sites-available/your_domain /etc/nginx/sites-enabled/
We’re done! In order to confirm that our server is working properly, we can run:
sudo nginx -t # tests our files in order to check for mistakes
If no error is present, an output similar to this one should appear:
nginx: the configuration file /etc/nginx/nginx.conf syntax is ok
nginx: configuration file /etc/nginx/nginx.conf test is successful
For all of our changes to take place, we’ll have to restart Nginx by using:
sudo systemctl restart nginx
Conclusion
In conclusion, Nginx is a high-performing, lightweight web server and reverse proxy that is known for its stability and simple configuration. Whether you’re hosting a small personal project or a large-scale commercial site, Nginx provides the versatility and reliability that you need.
By following the steps outlined in this guide, you should now have a functional Nginx server running on your Ubuntu 22 server. Remember, proper management of your server and a good understanding of your software can help ensure a secure and efficient environment. So, continue to learn and explore the functionalities of Nginx to make the most out of your web projects.
your hosting partner
RocketNode offers fast and affordable game and VPS hosting solutions on reliable and efficient hardware with AMD Epyc architecture and NVME storage to assure high performance.
See games & pricing